
Using AI
We host our own internal AI models for use with AI tools and integrations. You can access them through LiteLLM at https://litellm.internal.syslifters.com/.
You will receive your own LiteLLM key so you can use (almost) any AI-powered software in combination with our self-hosted models.
Setup
Claude CLI
- Install with winget
winget install -e --id Anthropic.ClaudeCode - To use our own LLMs with claude cli, set the following environment variables
sh
# Powershell
$env:CLAUDE_CODE_DISABLE_EXPERIMENTAL_BETAS = "1"                       # opt out of using beta versions
$env:DISABLE_PROMPT_CACHING = "1"                                       # disable prompt caching
$env:ANTHROPIC_BASE_URL = "https://litellm.internal.syslifters.com/"    # set local litellm url
$env:ANTHROPIC_AUTH_TOKEN = "YOUR_LITELLM_TOKEN"                        # set your personal auth token

# Linux
export CLAUDE_CODE_DISABLE_EXPERIMENTAL_BETAS=1
export DISABLE_PROMPT_CACHING=1
export ANTHROPIC_BASE_URL=https://litellm.internal.syslifters.com/
export ANTHROPIC_AUTH_TOKEN=YOUR_LITELLM_TOKEN- Now run claude with the default model
Powershell
claude.exe --model local_model_default # alias to use currently running local model, you can choose any running modelCline
Cline is a VSCode extension, which adds custom AIs to your IDE. It allows you to use many different AI providers:
- Install cline (https://cline.bot/) extension from marketplace in e.g. VSCode.
- When asked "How will you use Cline?" click "Bring my own API key"
- Use the following configuration:
- API Provider: OpenAI Compatible
- Base URL: https://litellm.internal.syslifters.com/v1
- API Key:
Bearer YOUR_LITELLM_TOKEN - Model:
local_model_default
Cursor
You can ask for a Cursor subscription if you need one. You can also bring your own model.
If using Cursor, make sure to maintain a global ignorelist to hold the agent back from accessing sensitive files:
bash
cat << 'EOF' > ~/.cursor/.cursorignore
**/.env
**/credentials.json
**/secrets.json
**/*.key
**/*.pem
**/id_rsa
secrets/
node_modules/
EOF
Source Code Analysis
For white-box pentests where we receive source code, we have an AI enhanced SAST tool: PentestAI.
How it works
This tool analyzes source code in stages:
- Discovery: This phase divides the source code into multiple sections. You can choose a model for that
- Planning: In this phase, agents analyze each section from phase 1 against a checklst of vulnerability types. You can choose a model for all the agents.
- Analysis: This is the actual analysis where agents search for vulnerabilities based on reported vuln types from phase 2. You can choose multiple models for all agents.
- Verification: An agent verifies each discovered vulnerability from phase 3. Choose one model for this step.
- Consolidation: Because there are likely duplicate findings, we deduplicate them. Choose a model for this phase as well.
Starting an audit
- To create an audit, set a project name and upload the source code (either ZIP or folder)
- Make sure all files and subfolders are at the root level of the ZIP file—don't wrap everything in a single main folder.
- Correct:
archive.zip -> file1.txt, file2.txt, subfolder/ - Incorrect:
archive.zip -> my_project/ -> file1.txt, file2.txt, subfolder/
- Correct:
- Delete unneeded directories with lots of files, such as
node_modules - You can place further documentation into the root directory (if available).
- Make sure all files and subfolders are at the root level of the ZIP file—don't wrap everything in a single main folder.
- Optionally, add a system prompt to the AI.
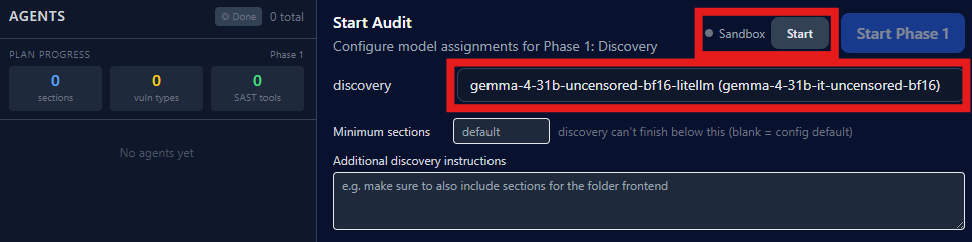
- Start the sandbox and choose a model for the discovery phase
- Next, choose the model used for planning. When using selfhosted LLMS make sure to hit the checkbox to force agents to work through the whole checklist.

- Before proceeding to phase 3, select one model (you can use the same one as used for phase 2). The UI provides a multi select, however only test with multiple models if external one's are explicitly allowed.
- Choose one model for verification and afterwards consolidation